Galaxy quilt – start to finish – 2014.12.31

As promised, here’s my construction process of the galaxy quilt from start to finish.  (I’m still referring to it as ‘the galaxy quilt’ because I haven’t decided on a title for it.)  Be warned, this is a long post.  It includes some photos I posted previously, plus a lot more information and photos.

Concept and design – For several months, I’ve been thinking about making an abstract art quilt of a spiral galaxy.   After looking at a lot of galaxy images, I made a rough sketch of the shape I wanted to use for a quilt.  My original idea was to redraw and refine my sketch, but the more I looked at it, the more I liked the abstract look of the sketch.

Here’s my original sketch.  I photocopied it at 400%, and traced it onto tracing paper with a more dramatic tilt to it.

DSCN4244  DSCN4245

Pattern – Then I enlarged the tracing paper image by 400% onto 8 pieces of 11 x 17 inch paper.  I taped those together to make my full-size pattern, which you can see below pinned on my design wall. Then I traced the design onto freezer paper, which I cut into pattern pieces and ironed to the back of the fabrics.  I numbered all the pattern pieces on the full-size pattern and on the freezer paper – so I wouldn’t lose track of which piece went where.

DSCN4248  TerryAske-galaxy quilt - freezer paper pattern

Fabrics – I pulled a lot of fabrics with black or dark backgrounds, plus a few of lighter ones for the center.  My original choices included a lot of warmer pink and red-violet colors.  As I auditioned the fabrics on my design wall, I decided I wanted cooler colors – blue, purple and a bit of teal.  (I will likely make another galaxy quilt in the future with the more dramatic pink and violet colors.)

For each pattern piece, I ironed the freezer paper template to the back of the fabric, cut it out with a 1/4″ allowance, then pinned it to the master pattern on the design wall.

I started with the center pieces in the lighter, brighter fabrics, then the outer pieces with the darkest fabrics. And finally the medium value blue fabrics.  I was determined to use only fabrics from my stash, so some fabric choices were dictated by the amount of fabric I had.

Galaxy quilt - under construction 1  Galaxy quilt - under construction 2

I tried not to dither too much about my fabric choices.  There was one fabric that I really didn’t like and changed later on – the gray on gray star fabric (left photo below) was replaced with a dark navy with white dots (right photo).  I think it added quite a sparkle.

TerryAske-galaxy-pinned to design wall  Terry Aske - galaxy - fused together

Construction process – Starting with the center pieces, I fused the pieces together.  I only applied fusible web to the overlapping edges of each piece, and in most cases used 1/2″ fusible tape.  By fusing only the edges, I saved time, used a lot less fusible web, and the quilt is less stiff.  The disadvantage was that the fused pieces were only attached at the seam allowances, which made it a little flimsy to work with, and if I didn’t press the pieces well they sometimes fell apart and had to be reattached.  I started the process using Lite Steam-a-Seam tape.  When I ran out of that, I turned to some EZ Steam tape I had on hand.  The EZ Steam was much stickier – which had advantages (it stayed in place better when finger pressed) and disadvantages (it would stick to itself if I didn’t pay close attention).

Here are the steps I followed to attach each piece to the previously assembled pieces (I wrote these steps out for myself, because the repetitive steps get boring and if I missed a step I risked fusing the tape to the freezer paper or iron):

  • unpin the fabric piece from the design wall
  • peel back the freezer paper on the edge to be fused
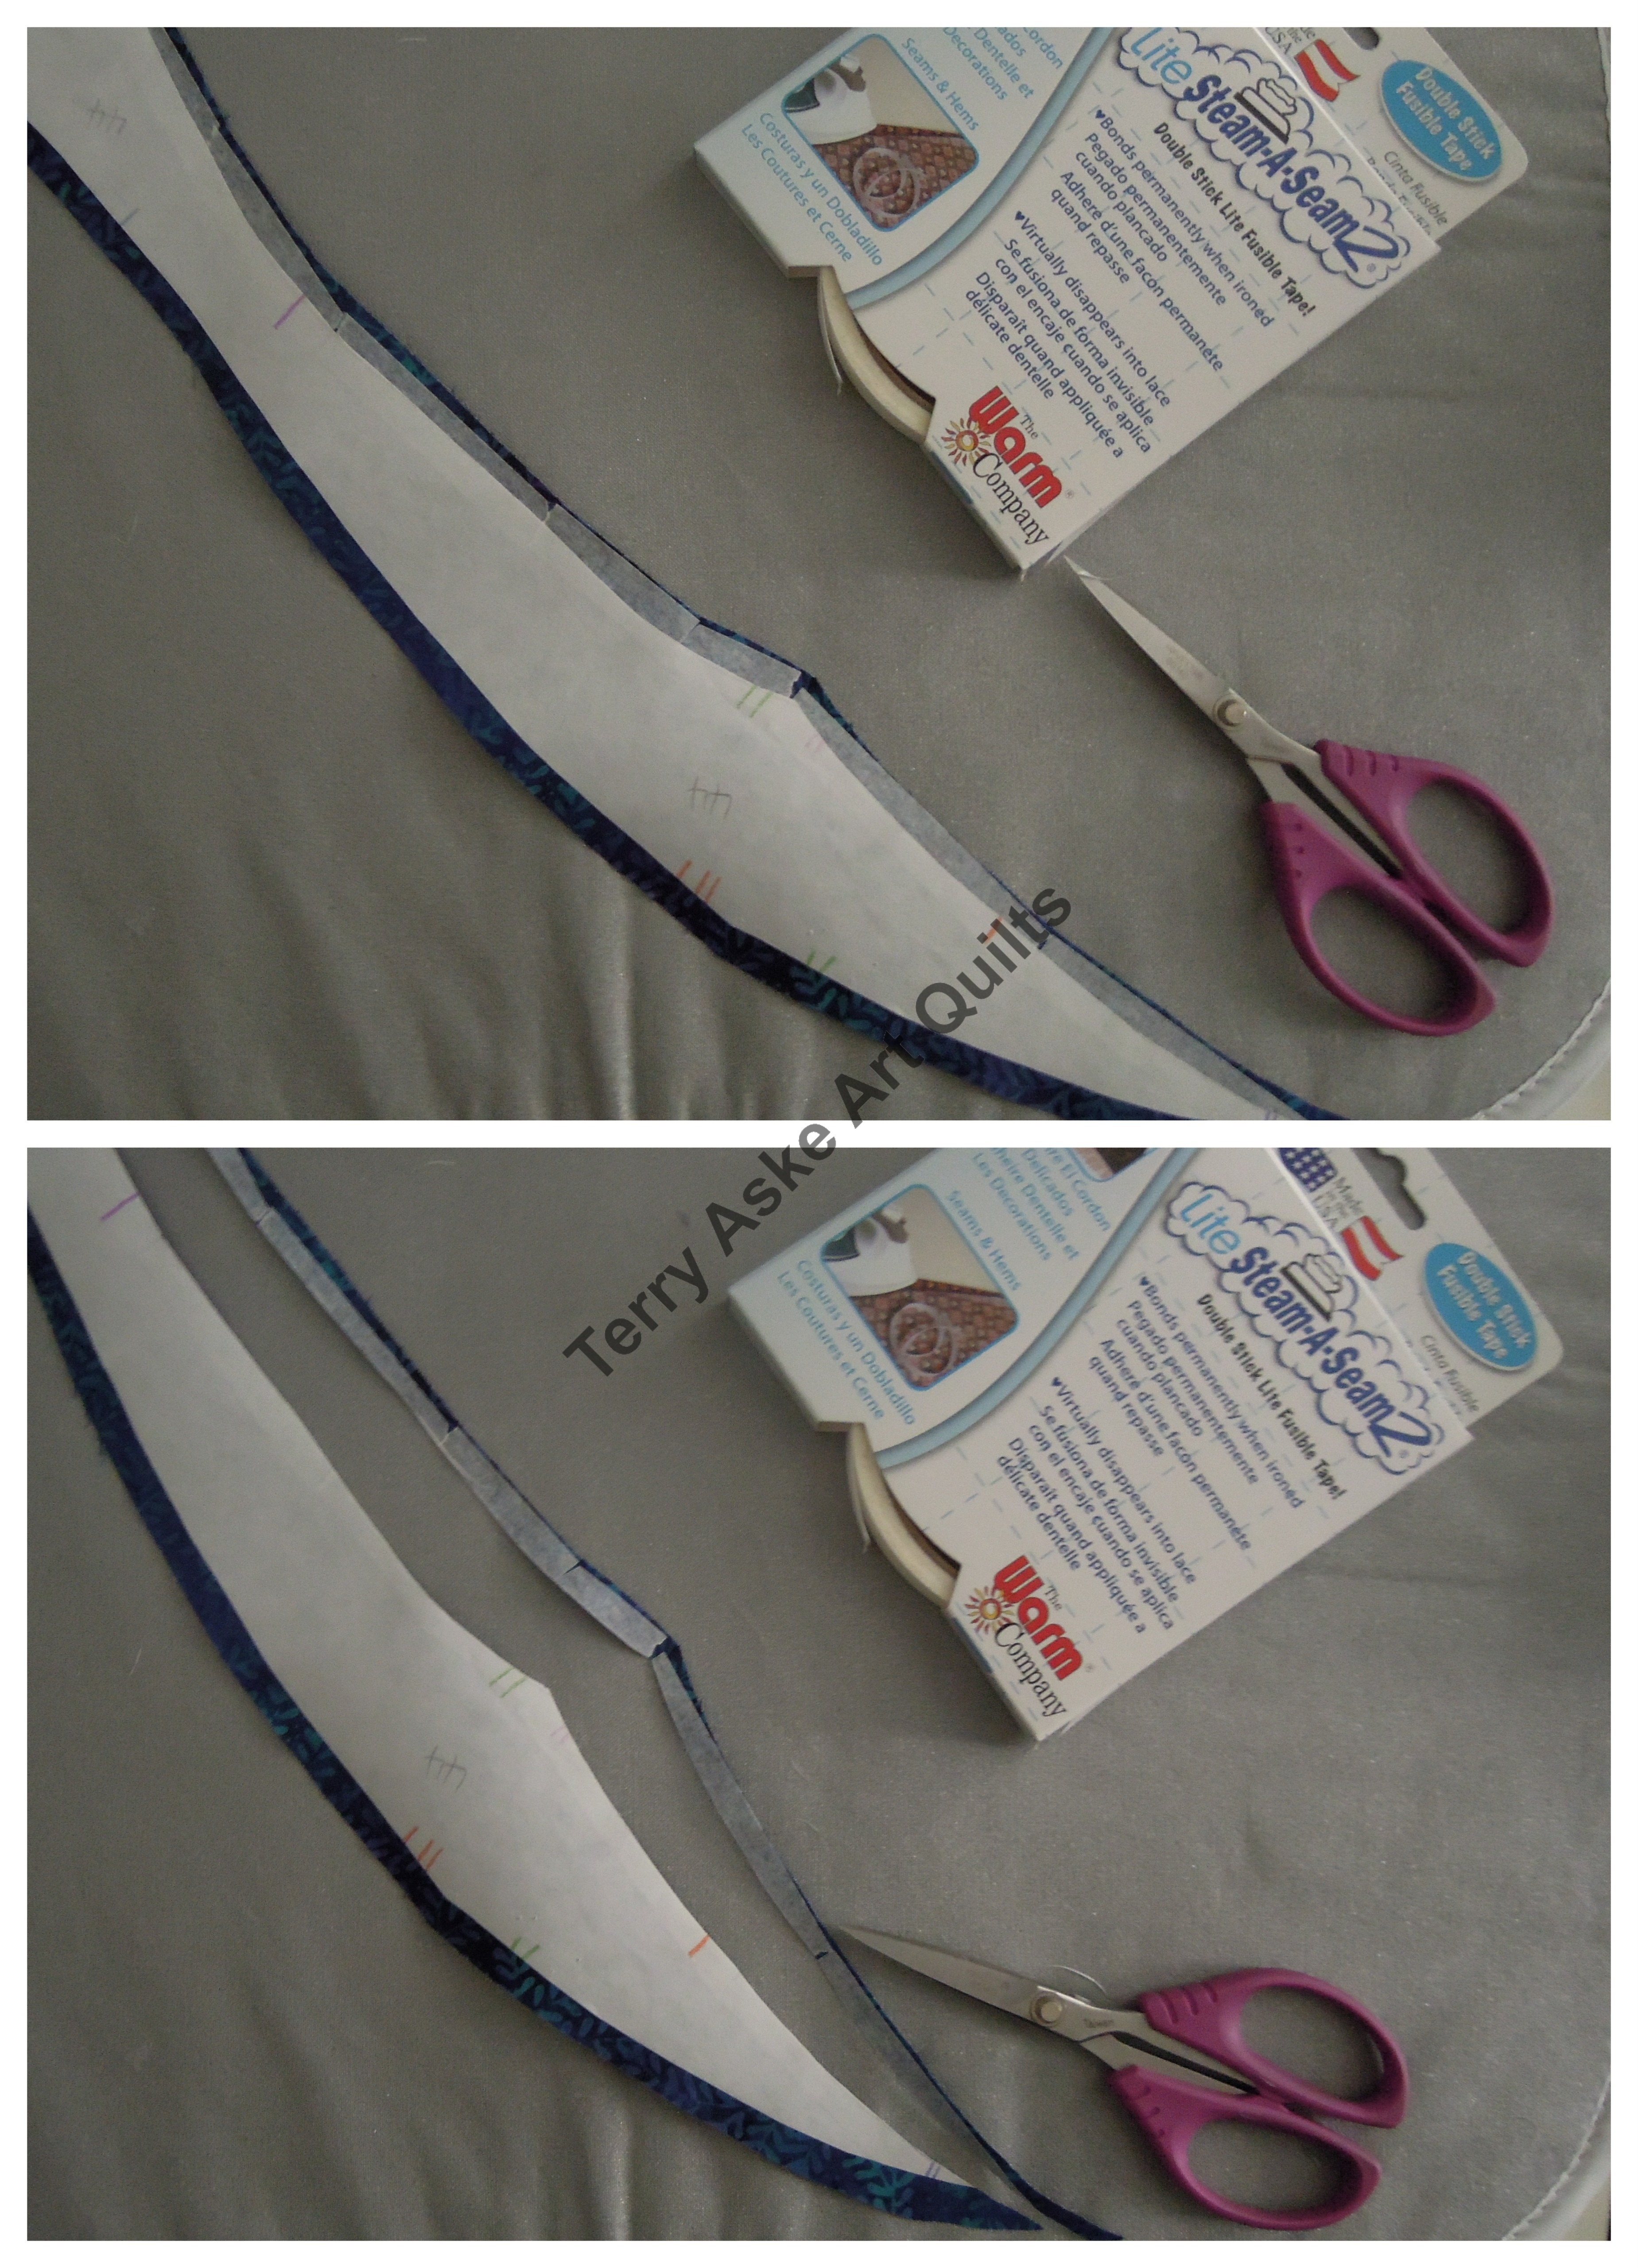
  • slide the 1/2″ fusible tape about 1/4″ under the edge of the freezer paper (top left photo below)
  • press the tape to the fabric, and at the same time press the freezer paper back in place on top of the fusible tape.
  • trim the fabric and fusible tape even with the edge of the freezer paper template – the freezer paper does not get trimmed (bottom left photo below)
  • peel back the edge of the freezer paper and remove the paper backing from the fabric
  • on an ironing mat, position the fabric piece in place with the fused seam allowance on top of the adjoining fabric piece(s).  The adjoining fabric piece(s) will have exposed unfused seam allowance(s).  Slide the new piece into position, with the fused edge of the new piece on top of the exposed seam allowance(s) and the freezer paper beneath the exposed seam allowance(s).  Finger press in place.
  • check the placement of the piece from the back (tick marks on freezer paper templates should line up)
  • carefully turn over, and check the placement from the front (making sure points align, and that there are no gaps between the pieces)
  • press the fused seam allowance of the new piece, first from the front, then from the back.  Leave the freezer paper attached to the back until the entire quilt top is assembled.  (In the right photo below, the center pieces have been fused and assembled and are lying on my pressing table.  The outer pieces are individually pinned to the design wall, waiting to be fused.)

      TerryAske-applying fusible tape to edge of fabric  TerryAske-center pieces fused together, outer pieces on design wall

In the photos below, all the pieces have been fused together.  At this point, I carefully peeled off the freezer paper templates from the back, and layered the top with batting and backing.

Terry Aske - galaxy - fused together  TerryAske-all pieces fused-back


Quilting – I quilted with 3 different variegated threads – a light gray-violet for the center, then a blue variegated on the blue fabrics, and a black-white-gray variegated for the dark fabrics around the outer edges.   I tested the threads, and my ability to stitch spirals with my walking foot, on a small 12″ x 12″ sample quilt.   TerryAske-testing threads on mini-quilt

The sample looked good, so I quilted the full-size quilt the same way.  I quilted along the fused edges to secure them in place, and to further emphasize the overlapping and intersecting curved lines and elliptical shapes.  Here it is after quilting.

TerryAske_galaxy_quilted

Facing – at first I was concerned that when the quilt was hung against a black background (as is typically used at quilt shows) the edges would ‘disappear’ against the background, and I thought I would bind it with a dark navy or purple fabric that would provide some contrast with a black background.  Then I decided it might look really effective if it appeared the blend into the background, so I faced it instead using my favorite facing technique.

Title – as I mentioned at the beginning of this very long post, I’m still referring to this quilt as ‘the galaxy quilt’ because I haven’t decided on a title for it.  I’ll have to decide before I enter it into a quilt show.  Some thoughts I’ve had are ‘Far, far away’ and ‘Baby, it’s cold out there’, but I may just call it ‘Galaxy’.  Any suggestions?

Thanks for reading all the way to the bottom.  I hope this has been interesting.

Today, I’m linking up with these blogs – click on the links below, where you’ll find many other creative and inspirational projects.

Confessions of a Fabric Addict   Esther’s Blog   Sew Fresh Quilts     Creations by Nina-Marie


Posted in Art quilts | Tagged , | 6 Comments

Merry Christmas Eve – 2014.12.24

As we walked around our neighborhood in the past few days, admiring the Christmas lights, I snapped a few photos with my iPhone.  Here are some of my favorites.

Christmas in New Westminster


I completed another pillow cover, bringing the total to three.  I still have more of this fabric and more pillow stuffing, so I’ll making more over the next while – until I run out of supplies.

TerryAske_3pillows-front

TerryAske_3pillows-back


The galaxy quilt is finished, except for the binding.   Next week, I’ll do a post showing my construction process from start-to-finish.

TerryAske_galaxy_quilted


Thanks for stopping by.  Today, I’m linking up with these blogs – click on the links below, where you’ll find many other creative projects to inspire you.

   Esther’s Blog   Sew Fresh Quilts

Posted in Art quilts, WiP Wednesday | Tagged , , | 6 Comments

Postcards received, WIP and QuiltCon entries – 2014.12.18

A couple of weeks ago, I blogged about my entries to Brandy Lynn‘s worldwide Snowflake postcard exchange.   On December 3rd, Brandy let us all know who we were exchanging postcards with, and I mailed mine off to Quebec and to the U.K.

Below you can see the gorgeous snowflake postcards I have received in the last week – all very different, and all beautiful!

Snowflake postcards received

The blue one is from Peggy in Quebec.  The multicolored one is from Annette in the U.K.  And the white one is a bonus postcard from my sister Anne in Victoria BC – who said once she started making postcards, she couldn’t stop!


I’m still working on pillow covers – two made and at least two more in progress.

DSCN4411


And the galaxy quilt is all fused.

Terry Aske - galaxy - fused together


I submitted 6 of my quilts to QuiltCon 2015, and last week I was happy to receive notification that one was accepted – ‘Shades of Gray’ (center of bottom row below) will be on display at QuiltCon in Austin in February.

Terry Aske QuiltCon entries


Thanks for stopping by.  Today, I’m linking up with these blogs – click on the links below, where you’ll find many other creative projects to inspire you.

   Esther’s Blog   Sew Fresh Quilts

Posted in Art quilts, Modern quilts, WiP Wednesday | Tagged , , , , , | 2 Comments

Pillow improvements – 2014.12.10

I want to thank Nicole for her comment about my pillow cover problem.

I had said “I did make the mistake of making the cover a little too large for the pillow form, so I’ll buy a larger form for this cover.”

Nicole said “If your pillow form is a bit small, you can wrap a strip of batting around it as many times as you need. You can roughly hand stitch the sides together but you don’t have to.”  What a brilliant idea!

I had a length of puffy poly batting (I can’t remember why I bought it) that was perfect.  I just wrapped it around the pillow form and stuffed it back in the cover.  It looks like it could use a bit more stuffing in the corners, but I’ll do that later.  I was also able to get photos with more accurate colors.  On the left is the pillow with just the pillow form; on the right after I wrapped a couple lengths of poly batting around the form.  Thanks, Nicole!

DSCN4264  Pillow - batting added


Here’s a peak at my progress on the galaxy quilt.  All fabrics pressed to freezer paper templates, and pinned to the design wall.  I’m going to change the gray on gray star fabric for a dark navy with white dots.  I’ll do start-to-finish post when it’s completed, showing my construction process.

TerryAske-galaxy-pinned to design wall


Thanks for stopping by.  Today, I’m linking up with these blogs – click on the links below, where you’ll find many other creative projects to inspire you.

WIP Wednesday at Freshly Pieced     Esther’s Blog   Sew Fresh Quilts


Posted in Art quilts, WiP Wednesday | Tagged , , | 3 Comments

Finished modern quilt and pillow cover – 2014.12.05

I have a couple of finishes to share today.

I’ve finished my VMQG Round Robin quilt.   When I brought it home from the guild meeting, I pinned it to my design wall and contemplated it for a few days.   I decided that some of the final borders were too wide – they seemed to be overpowering the center.   After debating with myself for a while, I cut some of the outer borders in half lengthwise (flying geese became half-square triangles).  I used some of the off-cuts as additional borders, and changed the shape from a rectangle to a square.   I pieced some of the off-cuts into the back, along with some darker borders I made that didn’t work out for the front.

I quilted it with a wonky square spiral, starting from the center of the circle block (which was my original block).  You can see the quilting better from the back.

DSCN4242   DSCN4192

I bound it with black prints and a few solid colors.  I’m trying to think of a title for it – any suggestions?

I found the I really enjoyed the whole Round Robin process, and plan to participate again next year.


I also completed the pillow cover I started a couple of weeks ago.  I quilted it with black thread and bound it with black fabric.  I even put a zipper in the back.  I really like how it looks, and I’m going to make several more pillow covers with the same fabrics.  I did make the mistake of making the cover a little too large for the pillow form, so I’ll buy a larger form for this cover.

DSCN4264  DSCN4265


Thanks for stopping by.  Today, I’m linking up with these blogs – click on the links below, where you’ll find many other creative and inspirational projects.

   Creations by Nina-Marie   Confessions of a Fabric Addict  

Posted in Friday finishes, Modern quilts | Tagged , , , | 5 Comments

A new project on my design wall – 2014.12.03

For some time now, I’ve been thinking about making an abstract art quilt of a spiral galaxy.   A few weeks ago I made a rough sketch.  Since I want the quilt to have an abstract look, I decided to just enlarge the sketch, rather than refining it making numerous more detailed drawings.

Here’s my original sketch.  I photocopied it at 400%, and traced it onto tracing paper with a more dramatic tilt to it.

DSCN4244  DSCN4245

Then I enlarged the tracing paper image by 400% onto 8 pieces of 11 x 17 inch paper.  I taped those together to make my full-size pattern, which you can see below on my design wall.  I’ve pulled a lot of fabrics that have black or dark backgrounds, plus a couple of lighter ones for the center.  Which fabrics actually end up in the quilt will depend on how they look when I pin them to the design wall.

DSCN4248  DSCN4252

I’m going to rough cut the fabrics and pin them on top of the pattern, starting in the middle and working out to the edges.  Once I’m happy with my fabric choices, I’ll apply fusible web on the edges and trim them to their final shapes.


Thanks for stopping by.  Today, I’m linking up with these blogs – click on the links below, where you’ll find many other creative projects to inspire you.

WIP Wednesday at Freshly Pieced     Esther’s Blog   Sew Fresh Quilts

Posted in Art quilts, WiP Wednesday | Tagged , , | 7 Comments

Snowflakes – 2014.11.29

Brandy Lynn of Brandy Lynn Designs has organized another fiber postcard exchange – theme: Snowflakes.  (I missed the summer Maple Leaf exchange, so when I saw the announcement for this one, I signed up right away.)

Terry Aske  Terry Aske Snowflake Postcards

I decided to go with a gold and black color scheme, and a modern look.  I cut narrow strips from several gold fabrics and sewed them together.  I drew the snowflake shape on fusible web which I fused to the back of the black fabric.  Then I cut out the snowflake shape and used the positive shape on one postcard, and the negative shape on the other.  I straight-line stitched around the snowflakes with a gold and black variegated rayon thread.

I haven’t made fabric postcards before, so I checked out a few online tutorials.  Monika at My Sweet Prairie Studio has a really good one, with lots of great tips – like using white thread in the bobbin so it won’t show through the backing – which I never would have thought of!  After making a couple of prototypes, I decided I would wrap the fabric from the front to the back, then I wouldn’t have to deal with the tedious job of finishing the edges.

For the back of the postcard, I designed it in Excel, then printed it on some ivory-colored linen-blend paper that I happened to have.  I fused the paper to the back, covering the raw edges of the fabric.  Then I stitched around the edges through all the layers.

DSCN4209  Terry Aske snowflake postcard 2

I had lots of fun making these, and will definitely enter more postcard exchanges in the future!


Thanks for stopping by.  Today, I’m linking up with these blogs – click on the links below, where you’ll find many other creative and inspirational projects.

   Creations by Nina-Marie   Confessions of a Fabric Addict

Posted in Modern quilts | Tagged , , | 5 Comments

Great news – 2014.11.25

This arrived in my virtual inbox at my Etsy shop – feedback left by the purchaser of my most recent custom pet portrait.  I’m touched and thrilled by her comments.

Toby - finishedThis is an extraordinary work of art, the perfect tribute to the life of our beloved canine companion, Toby. Terry is a gifted artist and quilter, and she is also compassionate and empathetic. She wanted the quilt to be perfect for us, and it is. Terry has an uncanny knack–a genius–for capturing the life and spirit of a creature and beautifully rendering this vibrant life force in fabric. Our dog, Toby, is so alive on the quilt, I almost expect him to leap from the center to plop on my lap with a giant lick. The quilt is truly magical.


And this arrived in my physical mailbox this afternoon.   A complimentary copy of the Winter 2015 issue of Art Quilting Studio magazine.  It will be on newsstands in a few days, and one of my self-portrait quilts is on pages 126 and 127.

ArtQuiltingStudioWinter2015  ArtQuiltingStudioWinter2015pp126-7

Posted in Art quilts, Publications | 5 Comments

On my design wall – 2014.11.19

I’m working on some pillow covers for our living room.  These are the colors I’m using.  I’m quilting them with black thread, and will bind them with black.  I plan to make several pillows in these colors, with a variety of geometric patterns.

DSCN4175


Thanks for stopping by.  Today, I’m linking up with these blogs – click on the links below, where you’ll find many other creative projects to inspire you.

WIP Wednesday at Freshly Pieced     Esther’s Blog  Sew Fresh Quilts


P.S.  Don’t forget to pop over to Blogathon Canada, a week-long blog hop of Canadian quilting blogs, sponsored by Sew Sisters Quilt Shop.  If you follow along, You’ll get to visit and meet some amazing Canadian quilting bloggers – and there are giveaways to enter every day!blogathon_badge_2014T

Posted in WiP Wednesday | Tagged , | 3 Comments

Welcome Blogathon Canada visitors!

I’m delighted to be participating in the third Blogathon Canada, a week-long blog hop of Canadian quilting blogs, sponsored by Sew Sisters Quilt Shop.  If you follow along, You’ll get to visit and meet some amazing Canadian quilting bloggers – and there are giveaways to enter!blogathon_badge_2014

The first stop is Beautiful British Columbia, and the BC hosts are Stacey of Stacey in Stitches, and Jessica at Momiji Studio.   Make sure you visit both of their blogs, and enter their giveaways.  And they will introduce you to many more BC quilters.

If you’re new to my blog, here’s some information about me.  I’ve been hooked on quilting since 1998.  I consider myself primarily an art quilter, but I’m also an enthusiastic member of the Vancouver Modern Quilt Guild, and I appreciate all styles of quilting.

I don’t have any new projects to show today (as my machine is getting it’s annual checkup), but here are a few of my recent projects.


Don’t forget to check out all the other BC quilters listed on Stacey and Jessica’s blogs, and check back with Sew Sisters for the rest of the week, as they travel across Canada.


Posted in Art quilts, Modern quilts | Tagged , , | 6 Comments